Appearance
Prevent Spam
Currently Headlessforms provides Spam Protection settings which can be turned ON and OFF manually. It's up to the form owner to decide if they want to filter out spam submissions but we would definitely recommend to keep the protection turned ON all the time.
If Spam Protection is ON then you can also decide if you'd want to delete Spam submissions automatically depending on their Spam Score
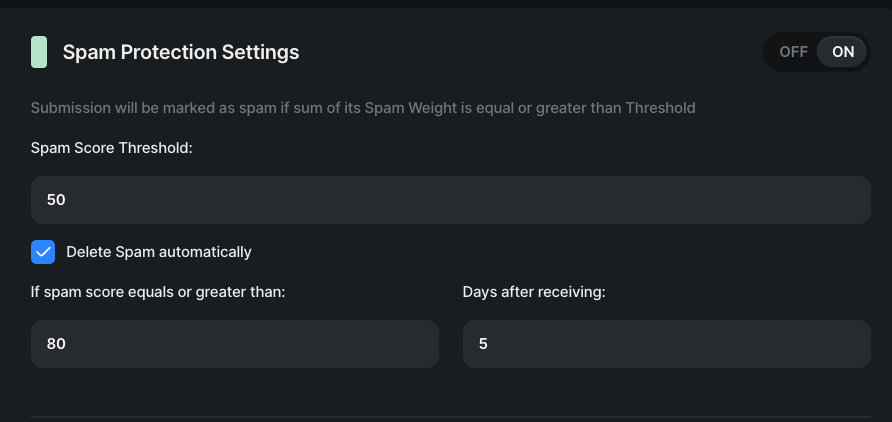
General rules:
- each submission has its own
Spam Scorewhich equals to0when received by our API - each Antispam tool has its own Weight
- if a tool is set up then submission is checked with such tool
- if a tool returns us a response that submission might be a spam, then
Spam Score = Spam Score + Antispam Tool's Weight - form submission will be marked as spam if its
Spam Scoreis equal or greater than Spam Score Threshold set in the Spam Protection Settings
Domain verification
We verify if submissions are coming from the website(-s) you listed or not. If a submission is coming from a different domain then such submissions will be blocked (i.e. not stored). We highly recommend to use this tool when you place your form on certain/specific website.
How to enable:
- Enter domain name which equals to domain name where your form is located
- Press ADD button
Akismet
Akismet checks your forms submissions against global database of spam to prevent your form from collecting malicious content. We recommend to turn this tool ON for forms in blogs collecting reviews or comments.
How to enable:
- you need to receive at least one submission into your form first
- select your fields for corresponding akismet fields, for example email field in your form should be mapped to for Akismet's
comment_author_email - the more Akismets fields are connected to your form's fields the more precise it detects spam
Akismet fields and their meannings:
comment_author- Name submitted with the commentcomment_author_email- Email address submitted with the commentcomment_author_url- URL submitted with comment. Only select a field containing URL that was manually entered by the usercomment_content- The content that was submitted
Google ReCAPTCHA
Google offers reCAPTCHA to help you protect your sites from fraudulent activities, spam, and abuse. To enable spam protection for your forms using Google reCAPTCHA, follow these steps:
Create a Google reCAPTCHA Secret Key:
- Generate your own Google reCAPTCHA Secret Key in the Google Cloud Admin Panel.
- Make sure to enter the domain name where the form will be hosted during the key creation process.
Access Form Settings:
- Navigate to the settings of your form.
Enable Spam Protection:
- Locate the "Spam Protection" section within the form settings.
Activate Google reCAPTCHA:
- Enable the option for "Google reCAPTCHA setup."
Enter Secret Key:
- Input the Google reCAPTCHA Secret Key you obtained from the Google Cloud Admin Panel into the designated input field.
Configure Spam Weight:
- Adjust the "Spam Weight" settings according to your preferences. For more information about spam weight, refer to the general rules.
Configure HTML Form:
- check Google reCAPTCHA v3 Documentation
- Update your HTML form to include the necessary elements.
- Ensure that a hidden field named
g-recaptcha-responseis included in your form. This field will hold the token generated from Google reCAPTCHA v3.
By following these steps, you'll successfully enable spam protection for your forms using Google reCAPTCHA.
Simple code example
html
<!doctype html>
<html lang="en">
<head>
    <meta charset="UTF-8">
    <meta name="viewport" content="width=device-width, user-scalable=no, initial-scale=1.0, maximum-scale=1.0, minimum-scale=1.0">
    <meta http-equiv="X-UA-Compatible" content="ie=edge">

    <title>reCAPTCHA Example</title>

    <script src="https://www.google.com/recaptcha/api.js?render=GOOGLE_SITE_KEY"></script>

    <script>
        grecaptcha.ready(function () {
            grecaptcha.execute('GOOGLE_SITE_KEY').then(function (token) {
                document.getElementById("g-recaptcha-response").value = token;
            });
        });
    </script>
</head>
<body>
    <form action="https://api.headlessforms.cloud/api/v1/form/YOUR_FORM_TOKEN" method="POST">

        <label for="username">Email:</label>
        <input type="email" name="email" id="email" required>

        <label for="username">First Name:</label>
        <input type="text" name="first_name" id="first_name" required>

        <label for="username">Last Name:</label>
        <input type="text" name="last_name" id="last_name" required>


        <input type="hidden" name="g-recaptcha-response" id="g-recaptcha-response">

        <button>Submit</button>
    </form>
</body>
</html>
HoneyPot
When a spam bot comes to a form, it fills out EVERY input field, but it ignores the CSS code. You will need to create a regular form input field with HTML - this will be the honeypot field. The spam bot will see the field, but you’ll use CSS to hide the field from users. If the honeypot field is empty, the form submission is considered as filled by a user. On the other hand, if the honeypot field has data, you know it could only have been filled out by a spam bot.
How to enable:
- enter field name which spam bots may will out for sure, usually it's
email - add field with the same name to your form on your website
- hide this email with CSS
- you may add multiple fields but do not forget to hide them from regular users
Form with honeypot field example:
html
<form method="POST"
      action="https://api.freihandlabor.dev/api/v1/form/{FORM_TOKEN}">

    <label for="name">Enter your name</label>
    <input type="text"
           id="name"
           name="name"
           placeholder="first name only"
           required="required"
    >
    <label for="abcdefg">Enter your email</label>
    <input type="email"
           id="email"
           name="abcdefg"
           placeholder="Enter Email"
           required="required"
    >
    <label class="ohnohoney" for="email"></label>
    <input
        class="ohnohoney"
        autocomplete="off"
        type="email"
        id="email"
        name="email"
        placeholder="Enter Your email"
    >
    <button type="submit">Submit</button>
</form>
<style>
    .ohnohoney{
        opacity: 0;
        position: absolute;
        top: 0;
        left: 0;
        height: 0;
        width: 0;
        z-index: -1;
    }
</style>
Email Verification
This tool verifies email addresses in form submissions if they belong to real persons or spam networks. Each submission will be checked and marked as spam if contains email from invalid, spammy or non-operational mailboxes. Works best with forms which collect emails (newsletters, promotions, subscriptions etc.)
How to enable:
- you need to receive at least one submission to your form
- select a submission's field which contains an email address
- the selected field value will be verified for every submission received